Guide optimized best SEO Friendly for blogspot all in one article, the latest update from Webmaster Tools 2014
Blogspot - a concept so familiar to those webmasters and SEO . Easy to use , fast , custom code , ... are the features of Blogspot that people believe it is used .
However, with the advent and development of the WordPress Blogspot is gradually losing its position . Wordpress has come and create a new breeze , especially in the time of electronic commerce is growing today. The reason is simple because almost everyone agreed that WordPress is the source "standard SEO " .
With the ability to optimize its almost perfect , WordPress is currently the world 's number one choice as SEO . So any path for Blogspot - son of the giant Google ?
Here , Adsenseco will guide you how to optimize Blogspot from A - > Z , hoping that after this article , people will have another look at Blogspot and find the right development for your Blog .
 |
| Guide optimized best SEO Friendly for blogspot all in one article |
Optimization tutorial my Blogspot will include the :
- Select the template .
- Edit the meta tags .
- Edit the article title .
- Set the friendly URL .
- Add Related Posts with old and new themes for bloggers .
- Guide written by standard post new blogspot seo 2.0
- Create a sitemap for Blogspot .
- Insert utility assessment post Rich Snippets , Star Rating and Google Authorship
- Make Breadcrumbs for Blogspot .
1 . Select the template .
Template is one of the important factors when using Blogspot a good template is not only beautiful but also have a logical structure . This will help your SEO process is much easier .
According Adsenseco personal experience , you should choose a template with 2 columns , left a message, to the right is the widget : New post , new comment , ... This is a common template and user- friendly .
Also a factor is equally important , which is heading tag structure . Most of the Blogspot temp after installing the <h1> only one , and the title of the article is <h2> or <h3> . This will make it difficult for you when you want to SEO a post .
"You can reference template "Super SEO 2014" here (This is a template has been optimized and friendly to search engines best - this template designed by Kangismet, is my re-edit, extra tools optimized for SEO. you can check the source code to see. inspection tool or "Structured Data testing tool." Should you have the desire to get "Template" please leave a message below or contact I will send the "template" for you)"
 |
| Template "Super SEO 2014" |
So when you select the template to note the structure of the temp , if available 2 <h1> cards , one for the entire site , and a title for the great article . And if not , do not worry , Adsenseco will guide you to change the article title in the next step <h1> .
2 . Edit the tags <meta> (Replace old Meta - <head> below)
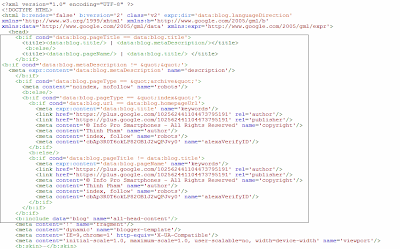
To edit the meta keyword and meta description of the temple you find the following code :
3 . Edit the article title.
a. Edit the article <title> card
Usually when you write a post , then your post will <title> as: Blog Title : Post Subject
However, for ease of this SEO post , insert the title of your post ahead . For example, article title | Blog Title
To do this you look to the code :
When you hover the article title , you will see something like the description for that link .
Add a description to the link of the article title
To do this, you do the following :
Log in to Blogger - > edit HTML - > Extensions
Locate the following line :
c . Adjust the post title <h1>
Log in to Blogger - > edit HTML - > Extensions
Find the following code:
5 - Find card after card 1 of 4:
Card 1:
showdate var = true; Otherwise want to display post date, you change True to False
var max_post = 8; Posts displayed in each section (Old and New) of utility
 |
| To edit the meta keyword and meta description |
<b:if cond='data:blog.pageTitle == data:blog.title'> <title><data:blog.title/> | <data:blog.metaDescription/></title> <b:else/> <title><data:blog.pageName/> | <data:blog.title/> </title> </b:if> <b:if cond='data:blog.metaDescription != ""'> <meta expr:content='data:blog.metaDescription' name='description'/> </b:if> <b:if cond='data:blog.pageType == "archive"'> <meta content='noindex, nofollow' name='robots'/> <b:else/> <b:if cond='data:blog.pageType == "index"'> <b:if cond='data:blog.url == data:blog.homepageUrl'> <meta expr:content='data:blog.title' name='keywords'/> <link href='https://plus.google.com/102562441104473795191' rel='author'/> <link href='https://plus.google.com/102562441104473795191' rel='publisher'/> <meta content='© Adsenseco - All Rights Reserved' name='copyright'/> <meta content='Adsenseco' name='author'/> <meta content='index, follow' name='robots'/> </b:if> <b:else/> <b:if cond='data:blog.pageTitle != data:blog.title'> <meta expr:content='data:blog.pageName' name='keywords'/> <link href='https://plus.google.com/102562441104473795191' rel='author'/> <link href='https://plus.google.com/102562441104473795191' rel='publisher'/> <meta content='© Adsenseco - All Rights Reserved' name='copyright'/> <meta content='Adsenseco' name='author'/> <meta content='index, follow' name='robots'/> </b:if> </b:if> </b:if>
<b:include data='blog' name='all-head-content'/>
Note: Replace the bold orange to suit your blog.3 . Edit the article title.
a. Edit the article <title> card
Usually when you write a post , then your post will <title> as: Blog Title : Post Subject
However, for ease of this SEO post , insert the title of your post ahead . For example, article title | Blog Title
To do this you look to the code :
<title><data:blog.pageTitle/></title>
And revised to :<b:if cond='data:blog.pageType == 'item'> <title><data:blog.pageName/> | <data:blog.title/></title> <b:else/> <title><data:blog.pageTitle/></title> </b:if>b . Add a description for the link title .
When you hover the article title , you will see something like the description for that link .
Add a description to the link of the article title
To do this, you do the following :
Log in to Blogger - > edit HTML - > Extensions
Locate the following line :
<a expr:href='data:post.link'><data:post.title/></a>and changed to :
<a expr:href='data:post.link' expr:title='data:post.title'><data:post.title/></a>Continue to find the line
<a expr:href='data:post.url'><data:post.title/></a>and edit success
<a expr:href='data:post.url' expr:title='data:post.title'><data:post.title/></a>Save the template and test results .
c . Adjust the post title <h1>
Log in to Blogger - > edit HTML - > Extensions
Find the following code:
 <b:if cond='data:post.title'>
      <h3 class='post-title entry-title' itemprop='name'>
      <b:if cond='data:post.link'>
        <a expr:href='data:post.link'><data:post.title/></a>
      <b:else/>
        <b:if cond='data:post.url'>
          <b:if cond='data:blog.url != data:post.url'>
            <a expr:href='data:post.url'><data:post.title/></a>
          <b:else/>
            <data:post.title/>
          </b:if>
        <b:else/>
          <data:post.title/>
        </b:if>
      </b:if>
      </h3>
    </b:if>
and changed to :<b:if cond='data:blog.pageType != "item"'> <b:if cond='data:blog.pageType != "static_page"'> <b:if cond='data:post.title'> <h3 class='post-title'> <b:if cond='data:post.link'> <a expr:href='data:post.link' expr:title='data:post.title'><data:post.title/></a> <b:else/> <b:if cond='data:post.url'> <a expr:href='data:post.url' expr:title='data:post.title'><data:post.title/></a> <b:else/> <data:post.title/> </b:if> </b:if> </h3> </b:if> <b:else/> <h1 class='post-title'> <b:if cond='data:post.link'> <a expr:href='data:post.link' expr:title='data:post.title'><data:post.title/></a> <b:else/> <data:post.title/> </b:if> </h1> </b:if> <b:else/> <h1 class='post-title'> <b:if cond='data:post.link'> <a expr:href='data:post.link' expr:title='data:post.title'><data:post.title/></a> <b:else/> <data:post.title/> </b:if> </h1> </b:if>Editing CSS for <h1> card , find the line (Paste the following code before the: ]]></b:skin>)
.post h3 {…}
.post h3 a, .post h3 a:visited {…}
.post h3 a:hover {…}
and edit success.post h1, .post h3 {…}
.post h1 a, .post h1 a:visited, .post h3 a, .post h3 a:visited {…}
.post h1 a:hover, .post h3 a:hover {…}
4 . Thread URL friendly .
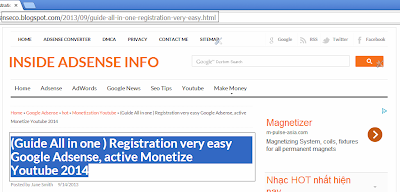
Every time you write a new post on blogspot , if you write the full title mark , it sometimes displays the following URL :
URL display and clearly incomplete
Here, the trial Adsenseco article titled : " ( Guide All in one ) Registration very easy Google Adsense , Youtube Monetize active 2014 ." Looking at the pictures you can see from the title , the original article URL has been shortened and some characters are lost . That's because the default URL Blogspot has 2 functions :
 |
| URL display and clearly incomplete |
First, always take the title of the article as the URL for that article , but it can not understand some of the different languages of the world should be born in the loss of some character .
Monday : Blogspot URL automatically truncated if the article title is too long .
So if you want a Friendly URL , SEO standards , we have to do?
It's simple to solve for the two cases can be used two ways:
- Method one: When writing a post , the original title was to not sign with the number of characters is not enough to shorten the URL and lost characters , then publish the article and return to edit the title became marked .
- Method two : Use the custom features of Blogspot URL
custom URL
With this feature you can freely adjust its URL . However, note that this feature is only adjusted once , ie after the publication of the article you can not edit the URL . So be careful when using .
 |
| Thread URL friendly |
5. Add Related Posts with old and new themes for bloggers.
1 - Login to the blog
2 - Select the template (template)
3 - Select the edit HTML => Choose extended utility model
4 - Paste the code below into before the: ]]></b:skin>
 |
| Add Related Posts with old and new themes for bloggers |
#related-posts-block ul{background:url(https://blogger.googleusercontent.com/img/b/R29vZ2xl/AVvXsEjanNJeZhbFhepXD88tyGySpJYBPvoz7a_-rhukSF_DqELGzee06v207Q8c2if0NKVx1_wl-QgeKVDPl1v0d-KPV4TUBl7ifVCwrIyaNg4M7TvKKF9rFPteCEQo4qdovC3M-57wEMPjcwY0/s1600/bg_other_namkna-blogpot.jpg) repeat-x;margin:0px 0 0 0;padding:6px 0 0 0;list-style:none}#related-posts-block li{margin:0 0 0 8px;background:url(https://blogger.googleusercontent.com/img/b/R29vZ2xl/AVvXsEju5KAoyMfXQ5XqLGMmWnLWGjgykGWEZKpw1Vp2qxOGIvo1lu7zCV8J50RziRaXILAaM-YiFNnJ8OXuHUpVhoVpLhuEcwmSPZtbbtHcZ91HSO5a0HvmBluuqptBk5lNB3zcSd85uI5ZV4MU/s1600/li_namkna-blogspot-com.png) 0 5px no-repeat;padding-left:15px}#related-posts-block{line-height:1.5;margin:0 0;font-size:11px;color:#7c7b7b}#related-posts-loading-text{font-size:12px;text-align:center;color:#002c28}#related-newest-href{margin:10px 0 2px}#related-newest-title{font-size:12px;margin:5px 0 0 0;color:#033947}#related-posts-block #related-newest-href a{font-size:12px;font-family:Arial,Helvetica,sans-serif;color:#002c28}#related-posts-block #related-newest-href a:hover{color:#00f}#related-older-href{margin:10px 0 2px}#related-older-title{font-size:12px;margin:5px 0 0 0;color:#033947}#related-posts-block #related-older-href a{font-size:12px;font-family:Arial,Helvetica,sans-serif;color:#002c28}#related-posts-block #related-older-href a:hover{color:#00f}#related-posts-block > div {float: left;width: 48%;}
5 - Find card after card 1 of 4:
Card 1:
<div class='post-footer'>Card 2:
<div class='post-footer-line post-footer-line-1'>Card 3:
<div class='post-footer-line post-footer-line-2'>Card 4:
<div class='post-footer-line post-footer-line-3'>=> Add and then one of the cards on the code below:
<script type='text/javascript'> //<![CDATA[ var showdate = true; var max_post = 8; //]]> </script> <b:if cond='data:blog.pageType == "item"'><div id='post-labels-for-related' style='display:none'><b:if cond='data:post.labels'><b:loop values='data:post.labels' var='label'><data:label.name/><b:if cond='data:label.isLast != "true"'>,</b:if></b:loop></b:if></div><div id='post-timestamp-for-related' style='display:none'><data:post.timestampISO8601/></div> <div id='post-timestamp-for-related' style='display:none'><data:post.timestampISO8601/></div> <div id='related-posts-block'><div id='related-posts-loading-text'>Loading...<br/><img align='absmiddle' src='https://blogger.googleusercontent.com/img/b/R29vZ2xl/AVvXsEhnnkwqphU-lZKg4xuziA9d89Kz_T4h3mssFcDrTQC0dkUdjDZX1d-AhPz_nD3qG0fMQdTfGIcEAsV72G-smlig_E1lnXgzHFw_yWKsDQJKTFtEeqUbAlKFYpxZCVCUsdXqpMjuwc7Boqmo/'/></div><div id='related-newest-href'><div id='related-newest-title'/></div><div id='related-older-href'><div id='related-older-title'/></div></div></b:if> <script type="text/javascript"> //<![CDATA[ function format(ptime){ return ptime.substr(0,19); } function formatdate(d){ var month = [1,2,3,4,5,6,7,8,9,10,11,12]; var month2 = ["Jan","Feb","Mar","Apr","May","Jun","Jul","Aug","Sep","Oct","Nov","Dec"]; var m = parseInt(d.substring(5,7),10); for(var j=0; j<month.length;j++){ if(m==month[j]){ m = month2[j]; break; } } return d.substring(8,10) + "-" + m + "-" + d.substring(0,4); } function getRelatedNewestLinks(json){ var entry = json.feed.entry; if(entry){ for(var k=0;k<entry.length;k++){ var li = document.createElement("li"); if(showdate){ li.innerHTML = "<a href='"+entry[k].link[4].href+"'>"+entry[k].title.$t+"</a>" + ' - <i>' + formatdate(entry[k].published.$t) +'</i>'; } else { li.innerHTML = "<a href='"+entry[k].link[4].href+"'>"+entry[k].title.$t+"</a>"; } if(!checkRelaxLinks("related-newest-href",entry[k].link[4].href)){ document.getElementById("related-newest-href-ul1").appendChild(li); document.getElementById("related-newest-title").innerHTML = "<b>Các bài viết mới cùng chủ đề</b> "; } } } else { document.getElementById("related-older-title").innerHTML = "<b>Không có bài viết mới nào cùng chủ đề</b>"; } } function getRelatedOlderLinks(json){ var entry = json.feed.entry; if(entry){ for(var k=0;k<entry.length;k++){ var li = document.createElement("li"); if(showdate){ li.innerHTML = "<a href='"+entry[k].link[4].href+"'>"+entry[k].title.$t+"</a>" + ' - <i>' + formatdate(entry[k].published.$t) + '</i>'; } else { li.innerHTML = "<a href='"+entry[k].link[4].href+"'>"+entry[k].title.$t+"</a>"; } if(!checkRelaxLinks("related-older-href",entry[k].link[4].href)){ document.getElementById("related-older-href-ul2").appendChild(li); document.getElementById("related-older-title").innerHTML = "<b>Các bài viết cũ cùng chủ đề </b>"; } } } else { document.getElementById("related-older-title").innerHTML = "<b>Không có bài viết cũ nào cùng chủ đề</b>"; } document.getElementById("related-posts-loading-text").style.display = "none"; } function createRelatedJson(min_or_max,cRJ_label,fcn_callback,cRJ_max){ var script = document.createElement("script"); script.src = "/feeds/posts/summary/-/"+escape(cRJ_label)+"?orderby=published&max-results="+cRJ_max+"&published-"+min_or_max+"="+escape(format(document.getElementById("post-timestamp-for-related").innerHTML))+"&alt=json-in-script&callback="+fcn_callback; script.type = "text/javascript"; document.getElementsByTagName("head")[0].appendChild(script); } function checkRelaxLinks(cid,clink){ var check = false; var u = document.getElementById(cid); var a = u.getElementsByTagName("a"); for(var i=0;i<a.length;i++){ if(a[i].href==clink){ check = true; break; } } var url = location.href.split(".html")[0]+".html"; if(clink==url) check = true; return check; } function createRP(){ var postLabel = document.getElementById("post-labels-for-related").innerHTML.split(','); var max_ = Math.round(max_post/postLabel.length); var ul1 = document.createElement('ul'); ul1.id = 'related-newest-href-ul1'; document.getElementById('related-newest-href').appendChild(ul1); for(var i=0; i<postLabel.length;i++){ createRelatedJson("min",postLabel[i],"getRelatedNewestLinks",max_); } var ul2 = document.createElement('ul'); ul2.id = 'related-older-href-ul2'; document.getElementById('related-older-href').appendChild(ul2); for(var j=0; j<postLabel.length;j++){ createRelatedJson("max",postLabel[j],"getRelatedOlderLinks",max_); } } createRP(); //]]> </script>Custom:
showdate var = true; Otherwise want to display post date, you change True to False
var max_post = 8; Posts displayed in each section (Old and New) of utility
6. Create a sitemap for Blogspot.
Most bloggers using Blogspot platform wants to have one as beautiful as the Wordpress site map. Today roam the network to find the blog template and learn the tricks to develop accidentally read blog post on how to create a Sitemap Widget beautiful Responsive to write and share with others
Prior to the demo you can see the standard sitemap here
 |
| Create a sitemap for Blogspot |
Step 1: Log into your blog admin area, click on the blog to create a sitemap.
Step 2: On the left click area on the page admin / Page and click on the last page -> select the blank page
Step 3: Insert the HTML editor and copy the code inside on page
<script src="https://dl.dropboxusercontent.com/u/36169749/scripts/widgets/btnt-sitemap.js" type="text/javascript"></script> <script src="http://adsenseco.blogspot.com/feeds/posts/default?max-results=9999&alt=json-in-script&callback=loadtoc"></script> <style type="text/css"> .post-archive { width: 100%; padding: 20px 0; text-transform: capitalize; } .post-archive h4 { border-bottom: 2px solid #EEEEEE; color: #333333; font-size: 20px; margin: 0 0 10px 2px; padding: 0 0 10px; } .ct-columns-3 { -moz-column-count: 3; -moz-column-gap: 10px; -moz-column-rule: none; -webkit-column-count: 3; -webkit-column-gap: 10px; -webkit-column-rule: none; column-count: 3; column-gap: 10px; column-rule: none;} .ct-columns-3 p { padding: 5px 0px; -moz-column-break-inside: avoid; -webkit-column-break-inside: avoid; -o-column-break-inside: avoid; -ms-column-break-inside: avoid; column-break-inside: avoid; display: inline-block; width: 100%; } .ct-columns-3 p a { background: #fafafa; color: #333; display: block; border: 1px solid #FFFFFF; font-size: 14px; line-height: normal; outline: 1px solid #EEEEEE; padding: 10px 15px; -webkit-transition:all .25s ease-in-out; -moz-transition:all .25s ease-in-out; -o-transition:all .25s ease-in-out; transition:all .25s ease-in-out; } .ct-columns-3 p a:hover { background: #555; color: #fff; } @media screen and (max-width: 768px){ .ct-columns-3 { -moz-column-count: 1; -moz-column-gap: 0px; -moz-column-rule: none; -webkit-column-count: 1; -webkit-column-gap: 0px; -webkit-column-rule: none; column-count: 1; column-gap: 0px; column-rule: none; } } </style>
Note: Instead of using your site http://adsenseco.blogspot.com
Step 4: Click Install the right-hand post editor and click off to post comments
7. Guide written by standard post the new blogspot 2.0 seo.
Especially in 2012 when google seo updates seo blogger's ability to help very well ... However, there are some ways to customize and post articles we have done manually to achieve the highest efficiency.
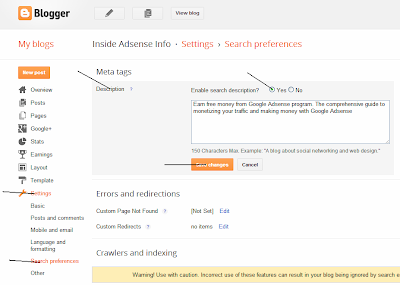
- First, to enable "Enable search description" for bloggers. Follow the momentum following:
Log in once on Blogspot >>> select "Settings" >>> navigate to "search description" Meta tags >>> description >>> >>> Select "Yes" and save (See image below)
 |
| Guide written by standard post the new blogspot 2.0 seo |
- Step 2: every time you post you need to write the following in the "Post settings" (right-hand side - the same side):
> Choose Label: ...
> Schedule: select Automatic
> Links: you can customize the instructions above or to default
> Location: Choose the location that suits you post.
> Search Description (this is the most important part of SEO Blogspot): You copy the first part of the article and paste it here. A maximum of approximately 80 - to 280 characters.
Note: you select an item done to save memory. (See image below)
 |
| Write the following in the "Post settings" |
8. Insert utility assessment post Rich Snippets , Star Rating and Google Authorship
9. Make Breadcrumbs for Blogspot .
9. Make Breadcrumbs for Blogspot .